Showing posts with label 3D houses. Show all posts

Friday, 14 April 2017

Magnolia Manor


Hi everyone,  I have had this one on the "back burner" for a couple weeks.  I was in Thailand when the kit was released. The first few days after I got home, I bought the kit, printed, cut out the paper and assembled it.
It wasn't until I decided to turn it into a "Wedding Reception" venue that I had a plan to decorate the house.

Welcome to Magnolia Bed and Breakfast. The couple are celebrating their big day at the historical house. I added burlap ribbon and flowers to the trim to give it a whimsical look.
Did you see the swing on the top photo?
Perfect for sipping your coffee on the front porch or enjoying a glass of wine.

This Magnolia Manor kit is really intricate and detailed. I think I watched the assembly video at least 6 times (LOL). Mary, you are an engineering marvel!


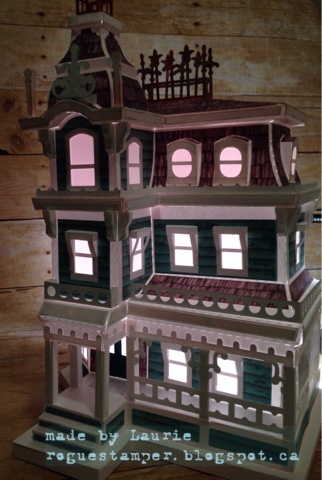
of course it lights up!


Monday, 18 April 2016

Woodland Fantasy Fairy House

What a great adventure I had making this little house.  It's the latest kit from SVGCuts.com
You can see the kit here
I added some flitting fairies around the house as well  here
I love all the little extra things going on around the porch. A rustic little railing, a fairy taking a nap on the roof, and the tiny toadstools popping up here and there.


view from the back of the house. I added some die cut vines
here's the two fairies hiding in the window. you can't see them until the house is lit up.
thanks for looking today. I really had fun making this house.  Mary you are my favorite designer. xo

Friday, 19 February 2016

Winter Lodge

Whaaaaat?! SVGCuts Winter Lodge kit is gorgeous! You can check it out here.

How did I do the stone work?  If you have Silhouette Design Studio, open your file, click on Fill pattern and there should be a "pebbles" pattern in your choices. click on it and increase the scale to however large you want your rocks to be. You can also Pan the pattern to move the dandelion out of the way.
I am lucky enough to have a large format printer, so it's easy for me to print off the whole 12x12 sheet,
I did the same thing for the facade/chimney and the roof.
The Stucco was a parchment color, and I added charcoal and brown distress markers, using the spritzer tool. (Tim Holtz)
the copper accents were cut on black paper and I dabbed bronze Distress Paint on the pieces.
the kit comes with 2 cute little planter boxes, but while I was at Michael's, I picked up these little wooden ones, I think they were $1.50. I added some twigs that I had in my stash.
Here it is all lit up, so gorgeous. Thanks Mary, for always continuing to inspire me. Your kits are outstanding. ( and no, I don't get paid to say that hahaha)  See you all soon...

Saturday, 4 July 2015

Old Town General Store

Happy 4th of July to my American friends. To Celebrate, I made 3D General Store, Americana Style.
SVGCuts.com had a new kit and as soon as I saw the store, I knew I had to have it.


Isn't it cute?! I stamped the base with Tim Holtz' big woodgrain stamp in Barn Door distress ink.
After assembly, I discovered that I glued it on the wrong way, so this is actually base #2.
I coloured the shutters and door with copics as well as the banner and stars (side of house)
The signs were made by turning the cut file into a print 'n cut in my Silhouette Studio program.
And the girls?  Paper doll cut files, oh those pieces were so tiny, but they look rather festive in their red white and blue.
I can imagine a Coke machine out front or some antique odds and ends on display. We are only limited by our imagination. I think this will be a great addition to my other houses this Christmas.
Happy long weekend y'all. Be safe and have fun.