Showing posts with label copic markers. Show all posts

Saturday, 5 April 2014

Isn't She Lovely?

Hi again,
I wanted to share this card I made with you.  When I saw the Prima stamp hanging on the rack, she spoke to me. I couldn't wait to stamp the image and color it in.

I used my Copics and Shinhan Touch markers to colour and blend and blend and bl....well, you get the idea. Of course, the reason why she "spoke to me" was that the stamp seemed very tropical to me. So I added frangipanni flowers to her hair, using a memory box die in various sizes. I added a swirly flourish as well to tie in the colours .

Recognise the background paper? Upcycled packaging from the Prima packaging. I don't throw anything away. (lol)

Anything goes at Simon Says Stamp Monday Challenge this week. You can check out the link here:

Monday, 9 December 2013

12 Days of Christmas Cards - Day 9

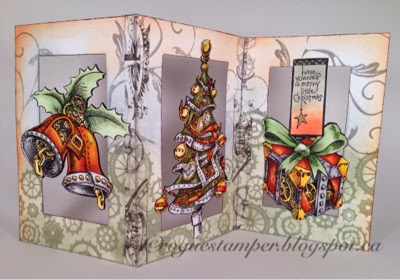
On the ninth day of Christmas my true love of paper gave to me: a steampunk accordian card.

Hello again, welcome to day 9. I have these great steampunk Christmas images from Make It Crafty.com so I printed them up and did a reverse image as well for all 3. That way, the card is reversible and looks the same on both sides.

I cut a window out of the 4x6 double thick card, decorated the panel with some homemade stamps
(I die cut some gears and a flourish out of fun foam)  then I used tissue tape to tape the panels together.
The images were colored with Shinhan touch and copic markers, cut out and glued back to back. (That's why I needed the reverse image)

I liked the way this one turned out, you've probably noticed over the past few posts that I've made quite a variety of cards, but that's what I like about making my own. You can personalize them so much. Now don't get me wrong, I don't make 25 different cards, I will make a few "in bulk" but for the most part, I really enjoy playing with ALL my different dies and stamps. 


Here's another steampunk card I made with the same images, just a little smaller and the Karen Burniston accordian die

That's all today, thanks for checking in on me.

Saturday, 7 December 2013

12 days of Christmas Cards - Day7

On the seventh day of Christmas, my true love of paper gave to me: 2 Happy Santas and some digi stamps from Make it Crafty.


Pretty self explanitory really. I layered and printed the images on heavy white cardstock and colored it with my Copics and Shinhan Touch markers. 
The coloring took a while, but with coffee and music in hand, I enjoyed the process.

Thanks for looking in, see you tomorrow.

Wednesday, 13 November 2013

What Santa Does in the Off Season

Hi again,
I had a lot of fun creating this piece. It started with the cabana tent. Laura Carson, over at Artfully Musing provided the carnival tent template, and I "modified" it into a cabana tent.

http://www.alphastamps.com/p14734/3D_Tents_Set_Download/product_info.html

The santas, lanterns and sleigh are from Make it Crafty colored with Shinhan and Copic markers.
http://www.makeitcrafty.com
The base measures 12 inches x 10 inches and is glued to the 12x12 back. I scraped lightweight modelling paste (tinted with a bit of "dune" pigment reinker from Clearsnap) on the base. Then sprinkled shimmer sand over certain areas.
All the images were printed on heavyweight bristol paper, colored, and cut out.
The banner is cut from Tim Holtz's die using the same paper as the tent. I had Letraset rub ons in my stash from many many years ago. Yes I do tend to hoard things, but you just never know...

The pink flamingo is from Hampton Arts for Graphic 45. Oh and can you spot the reindeer? They need a holiday too.
He's my favorite, this guy just makes me smile everytime I look at him.

Thanks for surfing by today. I hope you enjoyed my whimsical creation. I can't wait to start decorating for Christmas.