A mom moment for sure! I totally forgot to post this. I really haven't been myself lately. Permanent night shifts are wearing me down.
Anyhow, on with the show.
I managed to make some Mother's day cards for sharing here. The first one is inspired by Jennifer McGuire. She made a really cool offset card using a die. I cut the word out on my Silhouette and did an offset to create the "bubble?" around the word. I colored the layers of white cardstock with a gradient of grey tones (copic markers)
The hibiscus are from Heartfelt Creations, as are the shells along the bottom.
Crazy Dog Card.
This is a great way to use up scraps of paper too good to throw away. I created a pinwheel layout and stamped the dogs in each piece. I used pencil crayons this time. whenever I use pencils, I always think "I should use them more often" I get such a nice blend with them.
and of course, you didn't think I would not have used one of Mary's (SVGCuts) files for some Mother's day cards did you? I made all the little teacups for my co-workers complete with personalized name "teabags"
this box card is from the Garden Party Box Card kit. You can see the whole collection here.
Thanks for stopping by and having a look. Hopefully I can stay on top of things a little more. I love creating. It's my therapy. see you soon. Laurie
Tuesday, 30 May 2017
Sunday, 7 May 2017
Some Home Decor Projects
Hi everyone,
I am constantly keeping myself busy in my art space. I typically have a few projects on the go all the time. I wanted to share a few with you.
My cute little "beach" house is almost complete. I have to work on the backyard this summer, but that's another huge project that will come together eventually.
Project 1
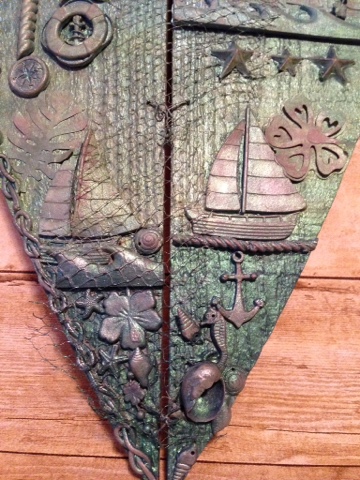
my rustic nautical welcome sign.
I had an old wooden heart that was really not my decor style at all, so I altered it into a mixed media piece. I had made a bunch of pieces out of air-dry clay and a silicone mold. They stayed in my stash for quite a while until I pulled them out and used them on this project.
this next one was quick and easy...(inspired by Pinterest)
I had a piece of wood that had broken off of a cutting board. I stained it with broken china distress stain. I then found the co-ordinates to my house and cut them out of vinyl. That was what took the most time - deciding on a font to use. The compass was also cut with vinyl and transferred to the edges.
and lastly, my new 24 x 36" picture that hangs in my kitchen. I have been downloading a lot of graphic design images from the hungry jpeg lately. They have a lot of great deals on images and fonts. The dogs were just too fun not to buy. The hardest part was piecing the 12x12 papers together to make it look seamless. I added some rope detail on the edges and some bling to the dog collars.
I am constantly keeping myself busy in my art space. I typically have a few projects on the go all the time. I wanted to share a few with you.
My cute little "beach" house is almost complete. I have to work on the backyard this summer, but that's another huge project that will come together eventually.
Project 1
my rustic nautical welcome sign.
I had an old wooden heart that was really not my decor style at all, so I altered it into a mixed media piece. I had made a bunch of pieces out of air-dry clay and a silicone mold. They stayed in my stash for quite a while until I pulled them out and used them on this project.
this next one was quick and easy...(inspired by Pinterest)
I had a piece of wood that had broken off of a cutting board. I stained it with broken china distress stain. I then found the co-ordinates to my house and cut them out of vinyl. That was what took the most time - deciding on a font to use. The compass was also cut with vinyl and transferred to the edges.
and lastly, my new 24 x 36" picture that hangs in my kitchen. I have been downloading a lot of graphic design images from the hungry jpeg lately. They have a lot of great deals on images and fonts. The dogs were just too fun not to buy. The hardest part was piecing the 12x12 papers together to make it look seamless. I added some rope detail on the edges and some bling to the dog collars.
that's it for now, I have a few more things coming up (hint: Mother's Day) so I will see you then...
Thursday, 4 May 2017
Urban Scrapbook's Monthly Challenge Kit - May
Hi everyone, I'm a bit late with the post, but I have been enjoying the sunshine (finally!)
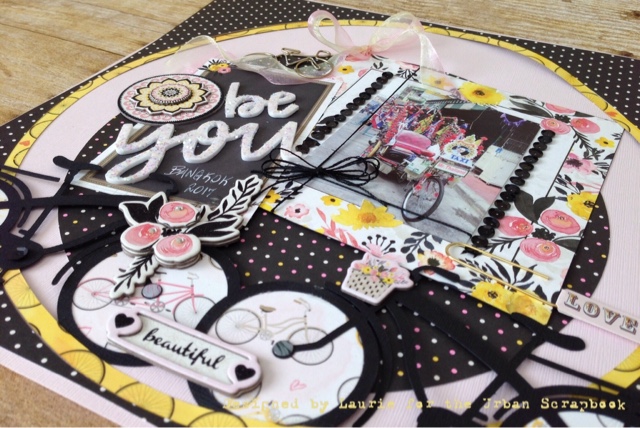
This month's kit at Urban Scrapbook includes papers from Bo Bunny Petal Lane
Have you visited Urban's blog recently? You can check out new posts and inspiration here.
for my layout, I cut large circles on my Silhouette machine along with the 2 bicycles. That was the only thing that wasn't in the kit. ok, I lie...see the little metal bicycle on the top? That was in a previous kit that I didn't use on the layout.Hoarding Saving stuff is useful. (hahahaha)
Thanks for stopping by, make sure you pick up your kit if you pop in to Urban Scrapbook, they usually sell out fast.
see you soon
This month's kit at Urban Scrapbook includes papers from Bo Bunny Petal Lane
Have you visited Urban's blog recently? You can check out new posts and inspiration here.
for my layout, I cut large circles on my Silhouette machine along with the 2 bicycles. That was the only thing that wasn't in the kit. ok, I lie...see the little metal bicycle on the top? That was in a previous kit that I didn't use on the layout.
Thanks for stopping by, make sure you pick up your kit if you pop in to Urban Scrapbook, they usually sell out fast.
see you soon
Friday, 14 April 2017
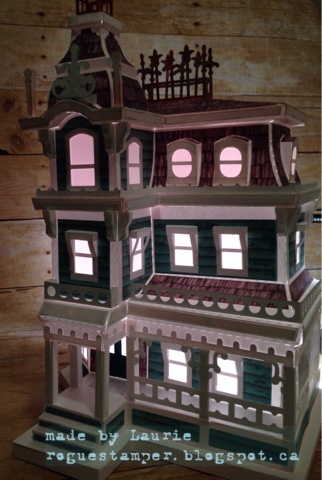
Magnolia Manor

Hi everyone, I have had this one on the "back burner" for a couple weeks. I was in Thailand when the kit was released. The first few days after I got home, I bought the kit, printed, cut out the paper and assembled it.
It wasn't until I decided to turn it into a "Wedding Reception" venue that I had a plan to decorate the house.
Welcome to Magnolia Bed and Breakfast. The couple are celebrating their big day at the historical house. I added burlap ribbon and flowers to the trim to give it a whimsical look.
Did you see the swing on the top photo?
Perfect for sipping your coffee on the front porch or enjoying a glass of wine.
This Magnolia Manor kit is really intricate and detailed. I think I watched the assembly video at least 6 times (LOL). Mary, you are an engineering marvel!
of course it lights up!
Happy Easter
Hi everyone,
I am here to wish you all a blessed and wonderful Easter weekend.
Here is to hope and renewal for the spring and summer seasons
I had a little get together with my "Inspire Me Girls" last week. We flipped through my binders of SVG kits that I had, looking for Easter projects. Debbie wanted to make the cute little egg house, I loved the retro feel of the chick and bunny cards - all from an older SVGCuts.com kit Cotton Tail Village.
Here are the finished results...
I cut most of the shapes with white cardstock and added distress ink to color in the pieces. The only paper that wasn't white on this card is the lovely yellow cardstock (Bo Bunny - Petal Lane)
The bunny card was entirely white paper. I love adding soft colors, especially for springtime cards. My bunny's eye looked weird, so I stuck an "eye" over top.
and here's the adorable egg house. I ended up making it instead of Deb. For this one, I dipped the panels in 3 colors of distress oxide ink. I love how it turned out. I used Lipstick, Broken China and Wilted Violet. The door and awning are just little scraps of patterned paper I had in my stash.
I am here to wish you all a blessed and wonderful Easter weekend.
Here is to hope and renewal for the spring and summer seasons
I had a little get together with my "Inspire Me Girls" last week. We flipped through my binders of SVG kits that I had, looking for Easter projects. Debbie wanted to make the cute little egg house, I loved the retro feel of the chick and bunny cards - all from an older SVGCuts.com kit Cotton Tail Village.
Here are the finished results...
I cut most of the shapes with white cardstock and added distress ink to color in the pieces. The only paper that wasn't white on this card is the lovely yellow cardstock (Bo Bunny - Petal Lane)
The bunny card was entirely white paper. I love adding soft colors, especially for springtime cards. My bunny's eye looked weird, so I stuck an "eye" over top.
and here's the adorable egg house. I ended up making it instead of Deb. For this one, I dipped the panels in 3 colors of distress oxide ink. I love how it turned out. I used Lipstick, Broken China and Wilted Violet. The door and awning are just little scraps of patterned paper I had in my stash.
Thanks for stopping in. I hope you have a wonderful weekend. I am starting my 5 night shifts tonight, so I hope the city behaves, apparently there is a rave tonight as well, so I'm sure we'll get some overdoses in the Emergency dept later. sigh. People should just stay home and make pretty things. LOL
Friday, 7 April 2017
Designer Handbag (or the closest thing I'll get to Burberry)
Hi lovlies,
This is the first run at the Elegant Handbag I made from the SVGCuts Brunch Party kit.
Yes, it is all paper, well ok, not the chain or tassel, but the rest is paper.
I love Burberry, but this girl will never be able to afford a real Burberry purse. Instead, I make pretty things. The size of the bag is perfect for storing inks or stamp sets. I can keep it in my art room and be all faux fancy. (LOL)
This is the first run at the Elegant Handbag I made from the SVGCuts Brunch Party kit.
Yes, it is all paper, well ok, not the chain or tassel, but the rest is paper.
I love Burberry, but this girl will never be able to afford a real Burberry purse. Instead, I make pretty things. The size of the bag is perfect for storing inks or stamp sets. I can keep it in my art room and be all faux fancy. (LOL)
Thanks for looking, see you soon...
Sunday, 2 April 2017
Urban Scrapbook's Monthly Challenge Kit - April
Hello April!
It's time to reveal my layout for the Urban Scrapbook's monthly scrapbook kit.
I love all the fresh spring colors.
Everything on this layout is in the kit this month, with the exception of the "stitching" on the edges.
I don't own a sewing machine, so I used a zig zag stamp (Tim Holtz). I stamped the image using the new Distress Oxide inks. Love those ink pads!
The little word blocks (vertical on the bottom) were colored with a green Copic marker.
Photo credit: found on Pinterest
Be sure to check Urban's blog for more page reveals from our fab design team!
Happy Spring!
It's time to reveal my layout for the Urban Scrapbook's monthly scrapbook kit.
I love all the fresh spring colors.
Everything on this layout is in the kit this month, with the exception of the "stitching" on the edges.
I don't own a sewing machine, so I used a zig zag stamp (Tim Holtz). I stamped the image using the new Distress Oxide inks. Love those ink pads!
The little word blocks (vertical on the bottom) were colored with a green Copic marker.
Photo credit: found on Pinterest
Be sure to check Urban's blog for more page reveals from our fab design team!
Happy Spring!
Subscribe to:
Posts (Atom)