Showing posts with label Bo Bunny paper. Show all posts

Thursday, 4 May 2017

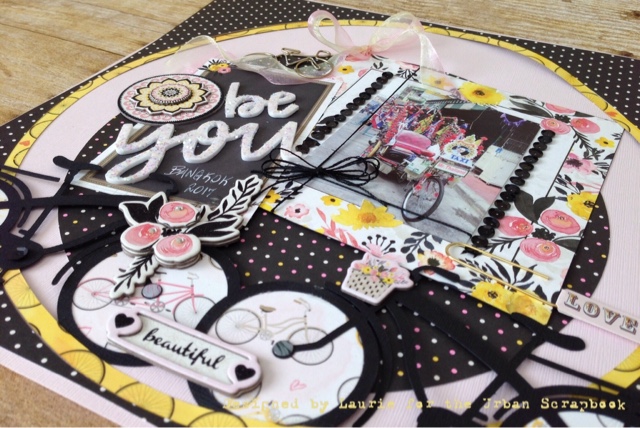
Urban Scrapbook's Monthly Challenge Kit - May

Hi everyone, I'm a bit late with the post, but I have been enjoying the sunshine (finally!)
This month's kit at Urban Scrapbook includes papers from Bo Bunny Petal Lane
Have you visited Urban's blog recently? You can check out new posts and inspiration here.
for my layout, I cut large circles on my Silhouette machine along with the 2 bicycles. That was the only thing that wasn't in the kit. ok, I lie...see the little metal bicycle on the top? That was in a previous kit that I didn't use on the layout. Hoarding Saving stuff is useful. (hahahaha)
Thanks for stopping by, make sure you pick up your kit if you pop in to Urban Scrapbook, they usually sell out fast.
see you soon

Wednesday, 5 October 2016

Urban Scrapbook's Monthly Challenge Kit - October

I am so excited for October...October 23 actually. So many of us love the colors of Autumn and the Halloween decorations. I wanted to capture that in my double page layout this month for Urban Scrapbook.
The kit includes the new Halloween line from Bo Bunny as well as some matching solid cardstock.
My left page features an image I found on Pinterest. It reflects the typical October feelings - pumpkins, dressing up for Halloween and just a little creepiness.
The right side is My October.  The Walking Dead is, hands down, my all time favorite TV show. Sundays are an event for me. I watch the show and the "Talking Dead" afterwards.
If you don't watch the show, you will have no idea what my page means, but OMG, Negan is going to beat someone to death with his barbed wired bat, endearingly named "Lucille". It's terrifying because we don't know WHO it's going to be...
thanks for stopping by, and, as always, you can check out the other layouts made by the awesome team over at Urban Scrapbook blog.

Wednesday, 23 December 2015

Church

okay, I think this is the last Christmas projectI will post...
I had shown my Silent Night Church to a dear friend/coworker and she loved it. soooo
I made this one for her.  I made it at 50% of the original size.
I altered a couple of things, allowing the steeple to be illuminated as well.
glitter,bells, snowflake paste and garland was used to embellish.
Merry Christmas everyone

Saturday, 19 December 2015

Snowflakes by Lamplight

Another one of those beautiful cut files from SVGCuts.com 
Boho Butterflies is the name of the kit
The sweet man gave me the idea to make a Halloween lamp, so of course, I had to do the Christmas spin too.
I used Bo Bunny papers for the base and shade, edged with some metallic silver ink
The vellum was slightly tinted with broken china distress ink and over stamped with white pigment ink and an old snowflake stamp I've had for years (PSX)
I really loved the way this one turned out, I wrapped it up and was part of our "secret santa" gift exchange at Urban Scrapbook's Christmas party. I know it went to a loving home. Hahaha.

Monday, 2 November 2015

Urban Scrapbook's Monthly Challenge - November

November already?! The month of fun Christmas Card making. I love making Christmas Cards. I have about a dozen made already, but on to the Monthly kit from Urban Scrapbook...

This month's kit is Bo Bunny paper. They are one of my favorite paper companies.
We have the lovely rustic tones of the Provence collection here.
Included in the kit is the super cute mini cutlery set from Tim Holtz, some cork paper and the layered chipboard from the same Bo Bunny collection.
This layout shows me and the sweet man dining at Les Halles in New York City.  We are big Anthony Bordain fans, so we happened upon Les Halles after a morning of shopping at Century 21. We had a fabulous late lunch.

I cut the "Bon Appetit" words on my Silhouette and cut bits and pieces from the paper in the kit to embellish the layout. I've also added some Amber, Espresso and Aged Mahogany distress ink to tie all the pictures and papers together,

In the background, I spread transparent texture paste mixed with vintage photo distress glitter over Tim Holtz' clockwork stencil just to give it a little more shine and interest.
See the paper cutlery pieces below? They were from the same cut file as the Bon Appetit words/

thanks for stopping by to check out the layout, be sure to have a look at the other November projects over on the Urban Scrapbook blog           see you soon!

Thursday, 5 March 2015

St. Patrick's Day treat boxes

Hi everyone:
Here's a couple of cute little treat boxes I made for St. Patrick's Day.

This first one was modified quite a bit.  it's the "Shamrock medium 3D Block Stick Decor" from Snapdragon Snippets.  I just wanted the shamrock so I cut out the top using an oval die before I glued it on to the sides.
The paper is from Bo Bunny.
This one turned out really cute.
Another Snapdragon Snippets file "Pot 'O Gold Box"
and the "Background Shamrocks"
I then cut many many circles out of gold cardstock and glued them together so they were shiny on both sides. I had an OLD stamp in my stash (4 sided celtic shapes from Judikins), so I stamped the coins with potting soil archival ink.
The little swirlies were left over from  the above paper cut out.
Now all I have to do is find some gold covered chocolates to fill them up!
Thanks for taking a peek, see you next time...
just a quick edit here...
I found some gold covered treats and took a quick pic to show
you what they look like filled with goodies. 

Wednesday, 28 January 2015

Valentines

Hello everyone,

I have some valentine cards to share with you. I love my  Silhouette machine ( as you all know). These cards were actually really fast to make. Let me show you...


The card above was a combination of 3 cut files. I added a little foiling glue in some areas and gilded his wings and bow. I also "smudged" some glue on the large heart and added some iridescent foil and gold leaf to that. A shadow press folder is in the top right. I used foam tape to adhere the cut outs for a little more dimention.

This next one was even quicker to make. One cut file, a basic square mat and mounted on a card base.  I made it a little "blingy" How?  I ran the squares through the xyron machine to coat them with adhesive, that made it easy to stick the filigree hearts on, next I pressed gold foil here and there over the exposed adhesive and then filled the rest with red glitter.

You've Got Mail

Hello again. 
I wanted to share this cute little mailbox I made.  It's a silhouette cut file from Lori Whitlock. And embellished with some extra hearts and flowers I had hanging around on my desk. 

I hinged the front part of the mail box and created a base and pole out of my hoarded recycles. (You just never know when they will come in handy) 
I made a few little "love letters" to go inside the mailbox too. Overall, a fun little project that looks cute on a table. Happy Valentine's day. 

Wednesday, 14 January 2015

Shasta Trailer - winter edition

Two words that should never be in the same sentence are winter and camping.  Seriously, who would want to camp when it's -20? Anyway, this is as close as I get to winter camping.

The kit is, of course, from my favorite website SVGCuts.com  you can see the it here.
I cut the pieces at 200% of the original size and added a trailer hitch and propane tanks to the front. The paper I used was from the Bo Bunny Altitude collection.

I used some distress inks in Seedless Preserves and Evergreen Bough to compliment the paper and a beautiful stamp from Indigo Blu on the top panel. The snowflakes were stamped with the same ink colors. They are from an older set I have, however I can't remember the name of the company.
I even made my own texture paste for the faux snow. I happened upon this great talented lady's blog Pamellia Johnson's "my little craft things" . I followed the recipe Pamellia shared. She has some wonderful tutorials, including the texture paste recipe post, which you can check out here

Thanks for stopping by, I hope you enjoyed my winter camping experience.

Sunday, 27 July 2014

Mid Summer's Night Blog Blitz - Day 3

Hi, welcome to day 3
Here is a fun cut file I downloaded off the Silhouette store. It comes with the box card, sun, flip flops, coconut, front leaves and words.  I added in some more tropical leaves,hibiscus and palm tree using dies and rubber stamps. I think it turned out pretty great. I love the bright vibrant colors
The side panels were embossed and inked with distress inks (picked raspberry and mustard seed)
Paper is from Bo Bunny
Below is a picture of the collapsed card ready to send off to someone, but I think I'll keep this one hehehe
Stop by next time for another summer time project. See you soon...